Enderby Contractors Remodeling, Painting, & Handyman Services for the Midland and Odessa region
  • Home
  • About
    • The Team
  • Services
    • Remodeling
    • Painting >
      • Commercial Painting
      • Residential Painting
      • Staining
      • Concrete Floor Coatings
      • Lead Safe Painting >
        • Lead Testing
    • Commercial Roof Coatings
    • Drywall
    • Handyman and Maintenance
    • Popcorn Ceiling Removal
    • Attic Ladder Installation
    • Finish Carpentry
  • Contact
  • Blog
  • Customers
  • Reviews

BLOG - Enderby Contractors Corner

A Fresh Start: A Step-by-Step Guide to Installing New Kitchen Cabinets

11/24/2023

1 Comment

 
Embarking on a journey to install new kitchen cabinets is an exciting step toward transforming the heart of your home. Whether you're upgrading your kitchen for functionality, aesthetics, or a combination of both, a well-executed cabinet installation can make a significant impact. In this comprehensive guide, we'll walk you through each step of the process, from planning to the finishing touches, ensuring a smooth and successful installation.
Content:
  1. Planning and Design:
    • Begin by measuring your kitchen space and assessing your storage needs.
    • Consider the layout, taking into account factors like the work triangle and accessibility.
    • Choose the style and material of your cabinets, keeping in mind your overall kitchen design.
  2. Gathering Materials and Tools:
    • List the materials and tools needed for the installation, including cabinets, screws, a level, a power drill, and a stud finder.
    • Ensure that you have all necessary safety equipment, such as safety glasses and gloves.
  3. Removing Old Cabinets:
    • Start by turning off power to any electrical outlets or switches in the cabinet area.
    • Carefully remove the old cabinets, beginning with the doors and then the cabinet boxes.
    • Patch and repair any holes or damage left by the old cabinets.
  4. Locating and Marking Studs:
    • Use a stud finder to locate and mark the studs in the walls where the new cabinets will be installed.
    • Mark the height at which the cabinets will be installed, ensuring they are level and plumb.
  5. Assembling Cabinets:
    • If your cabinets require assembly, follow the manufacturer's instructions to put them together.
    • Double-check the measurements and layout to ensure proper alignment during installation.
  6. Installing Upper Cabinets:
    • Begin installing upper cabinets first, securing them to the marked studs.
    • Use a level to ensure that the cabinets are straight and level.
    • Connect adjacent cabinets securely with screws.
  7. Installing Lower Cabinets:
    • Install the lower cabinets, starting from the corners and working your way toward the center.
    • Ensure that the base cabinets are level and secure them to the wall and each other.
  8. Securing Cabinets to the Wall:
    • Use screws to secure the cabinets to the wall studs, making sure they are firmly anchored.
    • Check for level and plumb as you go, adjusting as needed.
  9. Adding Cabinet Hardware:
    • Install cabinet hardware, such as handles and knobs, according to your design preferences.
    • Ensure that the hardware is securely attached and aligned.
  10. Final Adjustments and Touch-Ups:
    • Check all cabinets for alignment, making any necessary adjustments.
    • Fill any visible holes or gaps with wood filler and touch up the finish as needed.
Conclusion:
Congratulations! You've successfully installed new kitchen cabinets, bringing a fresh and stylish look to your culinary space. By following these step-by-step instructions and taking the time to plan and execute each phase with precision, you've not only enhanced the functionality of your kitchen but also added a touch of personal style. Enjoy your newly transformed space and the countless culinary adventures that await!

For professional cabinet planning and installation, we serve the Midland, Texas area. Please call us for your free evaluation. 
1 Comment

Transforming Your Kitchen: A Step-by-Step Guide to Painting Cabinets

11/24/2023

0 Comments

 
Picture
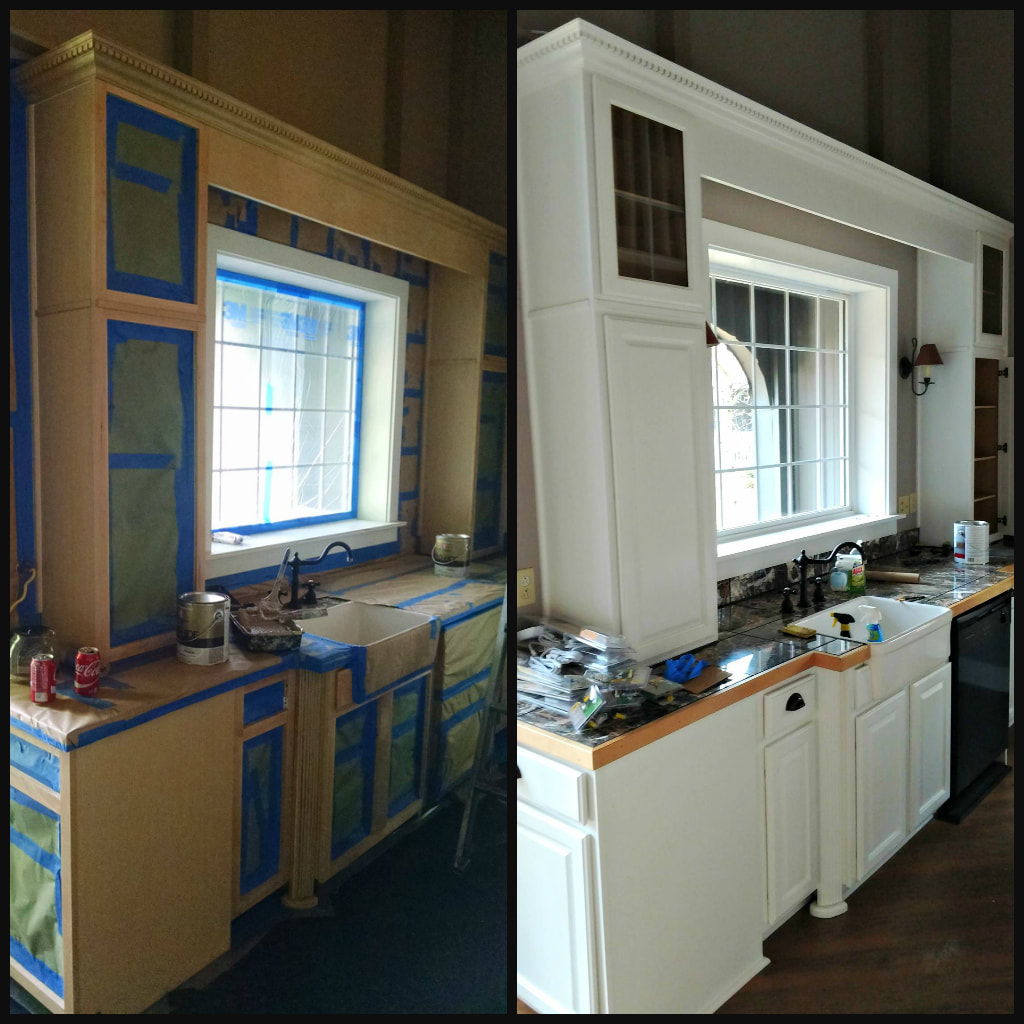
The kitchen is often considered the heart of the home, and updating its look can breathe new life into the entire space. One cost-effective and impactful way to refresh your kitchen is by painting the cabinets. This DIY project may seem daunting, but with the right materials, preparation, and a bit of patience, you can achieve professional-looking results. In this guide, we'll take you through the step-by-step process of painting kitchen cabinets to give your culinary haven a fresh and stylish makeover.
Materials You'll Need:
  1. Screwdriver and Hardware: Remove cabinet doors and hardware using a screwdriver. Take note of where each piece belongs to make reassembly easier.
  2. Drop Cloths or Plastic Sheeting: Protect your kitchen surfaces from paint splatter by covering them with drop cloths or plastic sheeting.
  3. Degreaser and Cleaner: Clean the cabinet surfaces thoroughly to remove grease, grime, and any residue. This step ensures proper paint adhesion.
  4. Sandpaper or a Sanding Block: Gently sand the cabinet surfaces to create a smooth, paint-ready texture. This step helps the paint adhere better and provides a lasting finish.
  5. Primer: Apply a high-quality bonding primer to ensure the paint adheres properly and prevents future peeling or chipping.
  6. Quality Paint: Choose a durable, washable paint suitable for kitchen cabinets. Satin or semi-gloss finishes are often recommended for their resistance to moisture and ease of cleaning.
  7. Paintbrushes and Rollers: Use high-quality brushes and rollers for a smooth and even application of paint.
  8. Painter's Tape: Protect areas you don't want to paint with painter's tape, such as hinges, countertops, and appliances.
Step-by-Step Guide:
  1. Remove Cabinet Doors and Hardware:
    • Carefully remove cabinet doors, drawers, and hardware.
    • Label each piece to simplify reassembly.
  2. Clean and Degrease:
    • Clean cabinet surfaces thoroughly using a degreaser to remove any built-up grease or residue.
  3. Sand the Surfaces:
    • Lightly sand all surfaces to create a smooth, paint-ready finish. Focus on any rough spots or imperfections.
  4. Apply Primer:
    • Use a high-quality bonding primer to ensure proper paint adhesion.
    • Allow the primer to dry completely before moving on to the next step.
  5. Painting:
    • Apply the first coat of paint using a high-quality brush or roller. Work in long, even strokes.
    • Allow the first coat to dry completely before applying the second coat.
    • Consider using a paint sprayer for a professional-looking finish, if available.
  6. Curing Time:
    • Allow the painted cabinets to cure completely before reattaching doors and hardware. This may take a few days to ensure the paint has fully hardened.
  7. Reassemble:
    • Carefully reattach doors, drawers, and hardware, following the labels made during disassembly.
  8. Finishing Touches:
    • Touch up any areas that may need extra attention.
    • Remove painter's tape and clean up any stray paint.
Conclusion:
Painting kitchen cabinets can be a rewarding and cost-effective way to update your kitchen's look. With careful preparation, the right materials, and attention to detail, you can achieve a professional finish that will leave your kitchen looking fresh and stylish. Transform your culinary space with this DIY project and enjoy the beauty of a newly painted kitchen for years to come.

For a free consultation in the Midland, Odessa Texas area, please reach out to us. 

0 Comments

    Author

    Cory Enderby - Author

    Archives

    November 2023
    July 2021
    October 2015
    September 2015

    View my profile on LinkedIn

    Categories

    All

    RSS Feed


Serving Midland and Odessa, Texas


​ASK ABOUT OUR DISCOUNT FOR MILITARY and FIRST RESPONDERS


Hours

M-Fri: 8am - 5pm
Sat: upon request

​

Telephone

Texas: (432) 653-2154
​             (432) 250-9998

Email

​[email protected]

Picture
Picture

Picture
Picture

Thumbtack
Enderby Contractors LLC
6 reviews
Picture
Picture
Expert Interior & Exterior House Painters Near Me
Picture


homeguide

Best Odessa Remodeling Contractors


  • Home
  • About
    • The Team
  • Services
    • Remodeling
    • Painting >
      • Commercial Painting
      • Residential Painting
      • Staining
      • Concrete Floor Coatings
      • Lead Safe Painting >
        • Lead Testing
    • Commercial Roof Coatings
    • Drywall
    • Handyman and Maintenance
    • Popcorn Ceiling Removal
    • Attic Ladder Installation
    • Finish Carpentry
  • Contact
  • Blog
  • Customers
  • Reviews